Clients - Installation
Package Installation
To install Yarra clients, download the Yarra client package form the Download Page.
Extract the archive into a folder on the host computer of the MRI system (or workstation PC for the SAC). The package can be unzipped into any directory. We recommend installing it into the folder C:\yarra.
Advanced User
To perform this procedure on a Siemens MRI system, it is necessary to first switch to “Advanced User Mode” by selecting the item in the Start menu and entering the password. On systems running the XA software line, it is necessary to leave the Kiosk mode.
MREmbeddedControl
On MR systems running software versions that use the MREmbeddedControl protection, it is necessary to start the MREmbeddedControlUI program and set the system into the Update Mode in order to white-list the Yarra binaries. Afterwards, the Yarra binaries can be copied. Start the binaries once and then switch the system back to Enabled Mode. It is recommended to use the installation path C:\MedCom\temp\yarra instead of C:\yarra on these systems.
Certificate Installation
On MR systems running the XA software line, it is necessary to install certificates before the Yarra binaries can be executed. Please contact us to obtain the certificates and installation instructions. Moreover, on XA11A or newer, programs can only be executed when using the ‘Run as administrator’ option.
Shortcut Creation
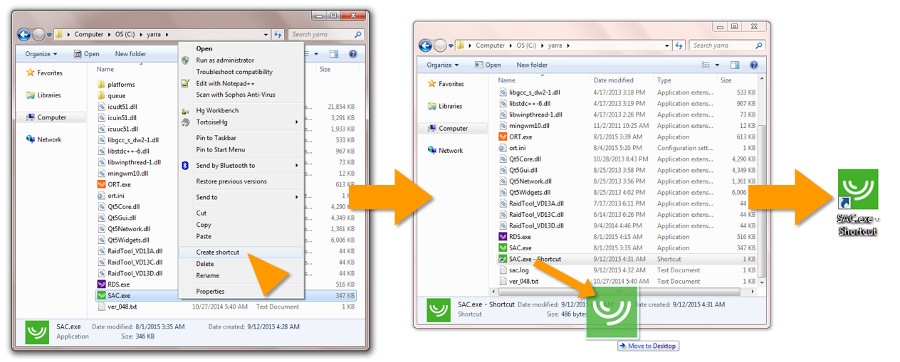
For convenience, shortcuts to the client programs should be created and placed in the Windows Start menu. Currently, these shortcuts need to be created manually by clicking on the respective .exe file with the right mouse button and selecting the option “Create shortcut” in the menu. The created shortcut icon can then be dragged into the Start menu (or onto the desktop for workstation PCs).
For ORT: We usually create a shortcut to ORT.exe and rename it to “Offline Reconstruction Task”. This shortcut is placed in the Start menu of the MRI systems.
For RDS: To ensure that the RDS client is loaded automatically during bootup of the scanner, a shortcut to RDS.exe must be created and placed in the “Startup” folder of the Start menu. The RDS client also provides an option to transfer the data immediately (instead of during the night). It is possible to trigger the transfer using a shortcut, which can also be placed in the Start menu of the MRI scans (this is optional). To this end, create a short cut, rename it to e.g. “Transfer Rawdata Now”, right-click and select “Properties”, and add the option ” –update” to the field “Target:”. The full entry should then read “C:\yarra\RDS.exe –update”.
On newer software versions of the MR scanners (VB and VE line, but NOT the XA line), reliable start of the RDS software can only be ensured by adding a call of the RDS binary to the batch file C:\Medcom\MriProduct\Inst\MROrdinaryUser.bat
which is linked from the Windows Start menu. Note that you are changing this batch file on your own risk!
The batch file can only be edited after setting MREmbeddedControlUI to UPDATE mode.